How to Build Functional and Aesthetic Minecraft Market Stands
To build a functional and aesthetic Minecraft market stand, start with a 5x5 block footprint using a mix of stripped logs and stone brick flooring. Trap a villager behind a counter using a combination of stairs and top-half slabs, ensuring their specific workstation (like a lectern or barrel) is integrated into the counter design. To prevent baby zombies from attacking your traders, use closed trapdoors or string across any 1-block gaps to block mob pathfinding while keeping the stall visually open.
Transforming a sprawling collection of chests and wandering villagers into a cohesive, bustling town is a major milestone in any survival world. A well-designed marketplace serves as the beating heart of your base, providing both a visually striking focal point and a highly efficient hub for acquiring enchanted books, diamond gear, and rare materials.
However, designing a market stand that looks authentic while functioning perfectly within the game's mechanics requires careful planning. If a stall is too small, villagers struggle with pathfinding. If it lacks proper defenses, a single baby zombie can wipe out hours of trading progress. This guide breaks down the architectural theory, block counts, and mechanical safeguards required to construct market stands that are widely regarded as both beautiful and survival-ready.
Why Every Minecraft Base Needs a Marketplace
In the early days of a survival world, players typically dig a hole or build a simple wooden box to trap villagers for trading. While this gets the job done, it severely limits the aesthetic potential of your world. Transitioning to a dedicated marketplace offers a dual purpose: it organizes your economy and establishes a "Town Square" that anchors your surrounding builds.
According to community design principles, a central marketplace acts as a visual anchor. When you build paths radiating outward from a central market, the rest of your town—houses, farms, and storage rooms—naturally falls into a logical, organic layout. Furthermore, functional villager trading stalls allow you to categorize your trades. Instead of hunting through a crowded room of identical-looking villagers to find your Mending librarian, you can simply walk up to the distinct, book-themed stall.
By integrating workstations directly into the architecture of the stalls, you create an immersive environment that feels alive. The marketplace becomes a destination rather than just a utility, elevating the overall quality of your survival base.
Choosing the Right Size for Your Market Stand
One of the most common mistakes builders make is scaling their market stands incorrectly. A stall that is too large will dwarf the surrounding houses, making the town feel empty. Conversely, a stall that is too small will feel cramped and make it difficult to incorporate the necessary lighting and workstations.
The "Golden Ratio" for a standard market stand footprint is either 3x3 or 5x5 blocks. This provides enough interior space for the villager to move slightly (preventing pathfinding glitches) while leaving room for a counter and a draped roof. Below is a comparison of different stall tiers based on community blueprints from GrabCraft's architectural database.
| Stall Tier | Footprint | Est. Block Count | Ideal Use Case |
|---|---|---|---|
| Tier 1: Small Medieval | 3x3 blocks | ~60 blocks | Tight alleyways, purely decorative builds, or single-item traders. |
| Tier 2: Medium General | 5x5 blocks | ~118 blocks | Standard villager trading. Fits a workstation, bed, and counter perfectly. |
| Tier 3: Large Professional | 7x5 blocks | 200–280 blocks | Complex professions like Blacksmiths or Bakeries requiring furnaces and anvils. |
| Tier 4: Grand Market | 10x10+ blocks | 400+ blocks | Major city hubs, harbor fish markets, or multi-villager cooperative stalls. |
For most survival players, the Tier 2 (Medium General) stall is a highly effective choice. It balances resource efficiency with enough structural depth to allow for creative roof designs and interior detailing.
How to Build a Functional Villager Trading Stall
A market stand is only useful if the villager stays inside it. Minecraft's villager AI dictates that they must be able to pathfind to their specific workstation to restock their trades. Therefore, the stall must act as a subtle trap that confines the villager without looking like a prison cell.
The most reliable method for achieving this is the "Counter Trap" mechanic. By placing a solid block or a stair block facing inward as the base of your counter, and topping it with a slab or trapdoor, you create a physical barrier. Villagers cannot jump over a 1.5-block high barrier. You can then integrate the workstation—such as a Lectern, Barrel, or Brewing Stand—directly into this counter line.
It is crucial to ensure that the player can easily interact with both the villager and the workstation. If you place the workstation too far back in the stall, the villager might stand in front of it, blocking your crosshair when you try to trade. Placing the workstation flush with the front counter ensures seamless interaction.
How to Protect Your Villagers from Baby Zombies
Open-air market designs are inherently vulnerable to hostile mobs. While standard zombies are easily blocked by a standard counter, baby zombies present a significant threat. Because their hitbox is only one block tall, they can easily sprint through the gaps above your counters or under your decorative awnings, potentially wiping out your most valuable traders.
Community discussions on forums like r/Minecraftbuilds frequently highlight this issue, leading to several established "proofing" techniques that maintain the open aesthetic while blocking mob pathfinding:
- The Slab and Trapdoor Method: Place top-half slabs directly above the counter space. A baby zombie requires a full 1-block vertical clearance to pass. By reducing the gap to 0.5 blocks, you create an impassable physical barrier that still allows you to see and trade with the villager.
- Using Closed Trapdoors: Trapdoors are exceptionally strong tools for mob proofing. When placed on the ceiling block above the counter and flipped open (so they hang down), they occupy just enough of the block's hitbox to confuse mob pathfinding AI, preventing them from attempting to cross the threshold.
- Strategic Lighting: Hostile mobs spawn at light level 0. To keep the stall illuminated without spamming ugly torches, hide lanterns underneath carpets inside the stall, or hang them from the highest point of the draped roof.
- The String Barrier: String is nearly invisible and can be placed on top of blocks to prevent snow buildup in winter biomes, or placed in gaps to manipulate mob pathfinding without altering the visual design of the stall.
Step-by-Step: Building the Classic Medieval Market Stand
The medieval aesthetic remains a top-rated choice for Minecraft builders due to its reliance on easily accessible materials like wood and wool. Here is a detailed breakdown of constructing a Tier 2 (5x5) medieval stall.
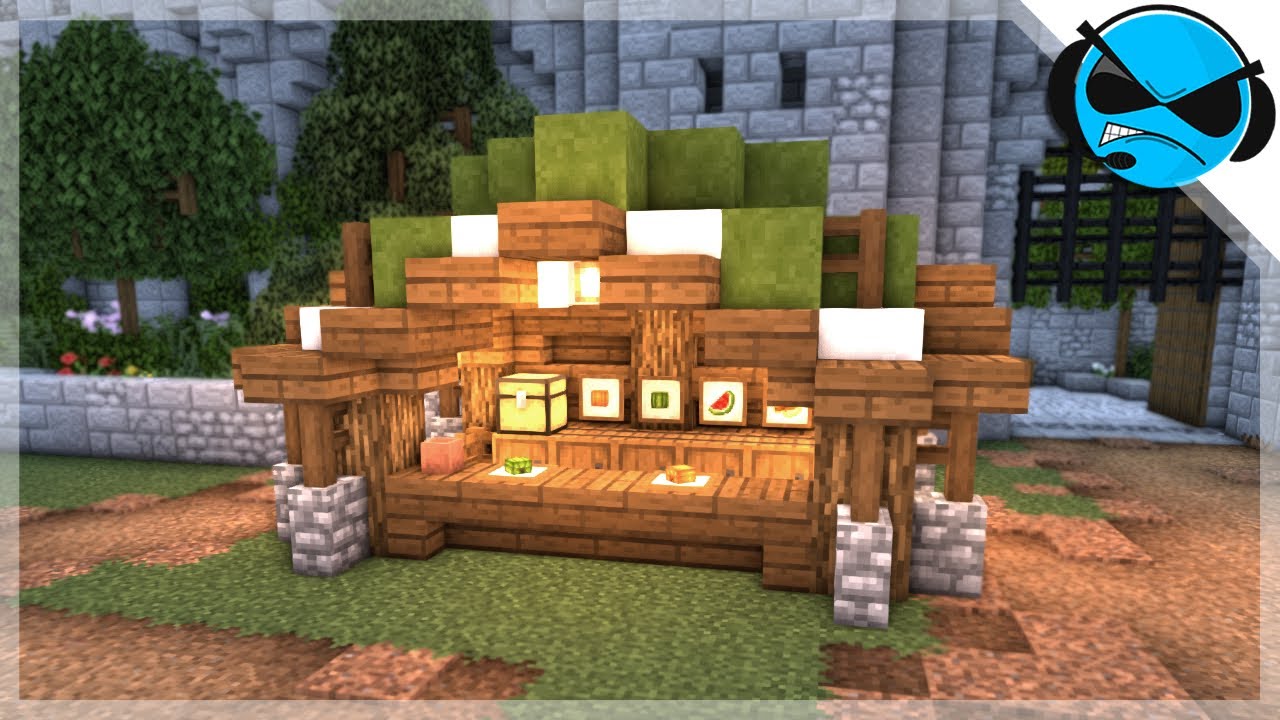
Image source: YouTube
Step 1: The Foundation and Framing
Begin by mapping out a 5x5 area. Place upright Stripped Oak Logs at the four corners, building them three blocks high. Instead of using solid blocks for the walls, use Oak Fences or Spruce Trapdoors between the pillars. This keeps the structure feeling "light" and portable, which is essential for a market stand. Solid walls will make the build look like a small house rather than a temporary commercial stall.
Step 2: Constructing the Counter
Across the front of the stall, place a row of Spruce Stairs facing inward. This creates a recessed look. Top these stairs with Spruce Slabs. Leave one block open in this counter line to place your chosen workstation. This setup provides depth and gives the villager a defined space to stand.
Step 3: The Draped Roof
A flat roof made of solid wool blocks looks unnatural. To simulate the "sag" of heavy fabric, you must use a gradient of heights. Start by placing a row of wool blocks across the top of your front pillars. Behind that, place a row of wool blocks one block higher. Then, use carpets on top of string to create an overhang that dips down at the front. Alternating colors—such as Red and White or Yellow and White—creates the classic awning pattern.
Step 4: Floor Contrast Theory
A crucial architectural detail is the floor. The interior floor of the stall must be a different texture than the marketplace path outside. If your town path is made of Gravel and Cobblestone, make the stall floor out of Coarse Dirt or Spruce Planks. This subtle contrast creates psychological "zones," signaling to the player where the public space ends and the private commercial space begins.
Customizing Your Stall for Every Villager Profession
Once the basic structure is complete, the interior detailing should reflect the specific profession of the villager occupying it. Generic stalls lack character; a specialized stall tells a story. Here are four distinct setups based on popular trading professions.
Essential Props: Lectern, Bookshelves, Cobwebs.
Detailing: Stack bookshelves erratically rather than in a perfect square. Place a cobweb in the upper corner to simulate a dusty, ancient archive. Use a lantern for warm, reading-friendly lighting.
Essential Props: Smoker, Campfires, Raw Meat.
Detailing: Dig one block down beneath the floor and place a campfire, then cover it with a smoker. The smoke will rise through the block, creating an active cooking effect. Place raw beef in item frames on the counter.
Essential Props: Brewing Stand, Cauldrons, Tripwire Hooks.
Detailing: Fill cauldrons with water or dyed water (in Bedrock edition). Place tripwire hooks above the cauldrons to look like faucets or taps. Use Amethyst clusters for magical ambiance.
Essential Props: Grindstone, Anvil, Lava Cauldron.
Detailing: Replace the wool roof with a fireproof material like Deepslate Tiles. Place an anvil on a log, and use iron bars instead of wooden fences for the structural supports to reflect the industrial nature of the trade.
Material Palettes for Different Minecraft Biomes
While Oak and Wool are standard, adapting your market stand to its surrounding biome creates a much more cohesive world. Swapping out the default materials for biome-specific blocks can dramatically alter the mood of the build.
- The Desert Bazaar
- Primary Blocks: Cut Sandstone, Acacia Logs, Orange and Yellow Terracotta.
- Design Logic: Acacia wood provides a striking contrast against the pale sandstone. Terracotta is used instead of wool for the roof, simulating thick, sun-baked clay tiles or heavy dyed canvas that fits the arid environment.
- The Tundra Market
- Primary Blocks: Stripped Spruce Logs, Snow Layers, Blue Ice, Deepslate.
- Design Logic: Wool roofs look out of place in a blizzard. Instead, use Deepslate stairs for the roof and top them with varying heights of Snow Layers to simulate heavy snowfall. Blue Ice can be used as a decorative base for a frozen fishmonger stall.
- The Jungle / Japanese Market
- Primary Blocks: Bamboo Wood, Cherry Logs, Pink Petals, Paper Lanterns (Sea Lanterns behind Trapdoors).
- Design Logic: Bamboo provides a lightweight, tropical feel. Cherry wood accents and scattered pink petals on the counter create a soft, vibrant aesthetic. This style benefits from a slightly curved roofline using stairs.
- The Nether Hub
- Primary Blocks: Crimson/Warped Stems, Polished Blackstone, Shroomlight.
- Design Logic: For players building trading halls in the Nether, all materials must be fireproof (Ghast-resistant where possible). The high contrast between dark Blackstone and vibrant Warped wood creates an intimidating, otherworldly marketplace.
Advanced Detailing Hacks for Java and Bedrock
To elevate a market stand from "good" to "professional," builders rely on micro-detailing. However, the techniques available depend heavily on which version of Minecraft you are playing. Understanding these platform differences is crucial for executing high-end designs.
The Invisible Item Frame Conflict
Placing items directly on a counter (like an apple or a sword) adds immense realism to a stall. In Java Edition, players can achieve this using a specific command to summon an invisible item frame: /give @s item_frame{EntityTag:{Invisible:1b}}. When placed on a counter, the frame is hidden, making the item appear as if it is resting naturally on the surface.
However, this command does not exist in standard Bedrock Edition (console and mobile). Bedrock players must rely on alternative methods. One popular workaround is the "Armor Stand Clip." By placing an armor stand holding an item, and using a piston to push a block into the armor stand's head space, the item appears to rest on the block. Alternatively, placing a standard item frame on top of a heavy weighted pressure plate can partially obscure the frame's borders.
Micro-Detailing with Flora and Signs
Regardless of your version, you can use small blocks to simulate clutter. Sweet Berries or Glow Berries placed in pots look like fresh produce. Sea Pickles can simulate cups or mugs. Additionally, placing blank signs across the front of your counter blocks adds a paneling effect that creates extra depth without taking up a full block space.
Designing a Full Marketplace Layout
A single market stand is a good start, but a full marketplace requires urban planning. If you place stalls randomly, the area will feel chaotic and difficult to navigate. A structured layout ensures smooth player movement and visual harmony.
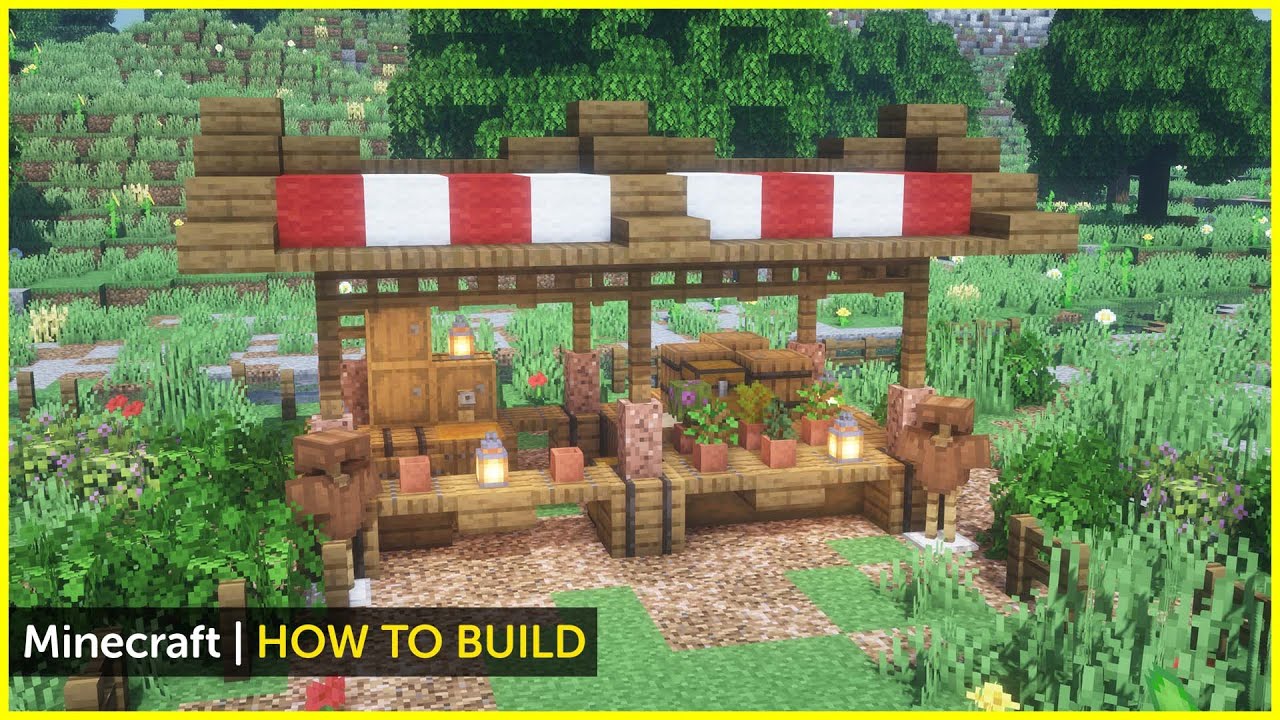
Image source: YouTube
A standard, highly effective blueprint for a small town square is a 16x26 block area. This rectangular footprint provides enough space for four to six Tier 2 stalls facing inward toward a central path.
The Central Feature
Every marketplace needs an anchor. This is typically placed in the exact center of the layout. A custom-built fountain, a massive custom Oak tree, or a central bell tower draws the eye and gives the villagers a gathering point (villagers naturally congregate around Bells during the day).
The 3-Block Clearance Rule
When laying out the paths between your stalls and the central feature, adhere strictly to the 3-Block Rule. There must be exactly three blocks of empty, walkable space between the front of a stall and any other structure. A 1-block path feels claustrophobic, and a 2-block path causes players to bump into villagers or other players when sprinting. A 3-block wide path accommodates the player's field of view (FOV) perfectly, allowing you to see the stalls on both sides while running down the center.
Frequently Asked Questions
How do I stop my villager from despawning in a market stand?
What roof color works well for a Minecraft market?
Can I use market stands for player storage instead of villagers?
How do I get a villager into the stall easily?
Do market stands have to be made of wood and wool?
Final Thoughts on Market Stand Design
Building a marketplace is a transformative step in any Minecraft survival world. By combining aesthetic detailing with the mechanical requirements of villager AI, you create a space that is both beautiful and highly practical.
- Plan your footprint: Stick to a 3x3 or 5x5 interior space to balance aesthetics with villager pathfinding.
- Secure the perimeter: Use trapdoors and top-half slabs to block baby zombies from entering the stall.
- Integrate workstations: Make lecterns, barrels, and brewing stands part of the front counter for easy trading access.
- Match your biome: Swap standard oak and wool for biome-appropriate materials like Sandstone or Spruce to ground the build in its environment.
- Maintain clearance: Keep a 3-block wide path between stalls to ensure smooth player movement through the town square.