How to Craft and Use an Armor Stand in Minecraft Java and Bedrock
To make an armor stand in Minecraft, open your crafting table and place 3 Sticks across the top row, 1 Stick in the center, and 2 Sticks on the bottom left and right corners. Finally, place 1 Smooth Stone Slab in the bottom center slot. This recipe yields one armor stand.
Whether you are looking to display your hard-earned diamond gear, create custom map decorations, or build a functional armory, the armor stand ranks among the top decorative entities in Minecraft. Bridging the gap between a storage container and a decorative block, these wooden figures offer remarkable versatility for builders.
However, crafting and manipulating them can be surprisingly complex. The recipe features a specific stone variant that frequently trips up new players, and the mechanics for posing the stands differ significantly depending on which version of the game you are playing. This guide covers the exact crafting process, how to navigate the common smooth stone hurdle, and advanced techniques for posing and animating your stands.
What Materials Do You Need to Craft an Armor Stand
Before you open your crafting grid, you need to gather the correct raw materials. The recipe itself is relatively cheap, making it accessible early in a survival playthrough. You will need exactly two types of items:
- 6 Sticks: These form the wooden frame of the stand.
- 1 Smooth Stone Slab: This serves as the heavy base that keeps the stand upright.
The Stick Shortcut
Gathering sticks is straightforward. You can use any type of wood log (Oak, Spruce, Birch, Cherry, etc.) to craft wood planks. Placing two wood planks vertically in your crafting grid yields four sticks. Because you need six sticks in total, you will need to craft this stick recipe twice, requiring a minimum of four wood planks (which can be derived from a single log).
The Smooth Stone Requirement
This is where many players encounter friction. According to community discussions and troubleshooting threads on Reddit, the most common reason an armor stand recipe fails is the use of the wrong base material. You cannot use a Cobblestone Slab, a Stone Brick Slab, or even a regular Stone Slab. The recipe strictly requires a Smooth Stone Slab, which involves a multi-step smelting process.
Pro Tip: If you are gathering materials in bulk, a quick reference for crafting exactly one armor stand from scratch is: 1 Wood Log, 3 Cobblestone blocks, and enough fuel (like coal or wood) to smelt three items twice.
How to Get Smooth Stone Slabs Without Getting Stuck
If you are staring at a chest full of cobblestone and wondering why your armor stand recipe isn't working, you need to process that stone through the "Smelting Pipeline." Smooth Stone is a refined block that does not generate naturally in easily mineable ways early in the game, meaning you must create it yourself.
Follow these exact steps to create the necessary base for your armor stand:
- Mine Cobblestone: Use any pickaxe to mine at least three blocks of stone, which will drop as Cobblestone.
- Smelt into Regular Stone: Place your Cobblestone into a furnace along with a fuel source (coal, charcoal, or wood). Smelting Cobblestone yields regular Stone.
- Smelt into Smooth Stone: Leave the newly created Stone in the furnace (or put it back into the top slot) and smelt it a second time. This second round of smelting transforms regular Stone into Smooth Stone. You will need three blocks of Smooth Stone to proceed.
- Craft the Slabs: Take your three blocks of Smooth Stone to a crafting table. Place them in a horizontal row across any of the three rows in the grid. This recipe yields six Smooth Stone Slabs.
You only need one of these slabs for a single armor stand, leaving you with five extra slabs for future crafting or building projects.
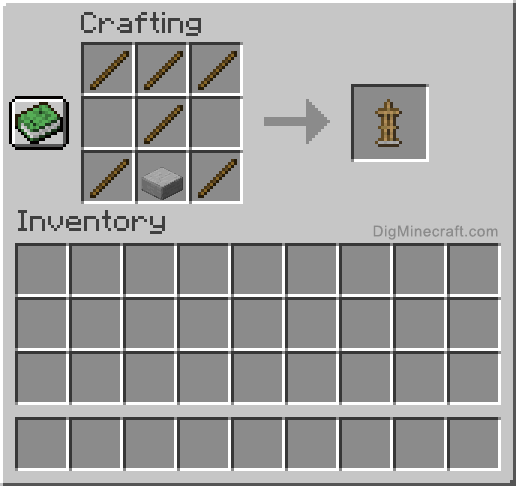
Image source: DigMinecraft
Step-by-Step Instructions for Crafting Your Armor Stand
Once you have your six sticks and your smooth stone slab, the actual assembly is simple. Open your 3x3 crafting table interface and arrange the items in a specific "H" pattern with a base.
The Crafting Grid Layout:
- Top Row: Place one Stick in the left slot, one Stick in the middle slot, and one Stick in the right slot.
- Middle Row: Leave the left slot empty, place one Stick in the middle slot, and leave the right slot empty.
- Bottom Row: Place one Stick in the left slot, the Smooth Stone Slab in the middle slot, and one Stick in the right slot.
If placed correctly, the armor stand icon will appear in the result box. Simply click or tap to move it into your inventory.
Stacking Rules and Inventory Management
Depending on which version of the game you are playing, inventory management for these items varies. According to the official Minecraft Wiki technical data, players on Java Edition can stack armor stands up to 16 per inventory slot. Conversely, players on Bedrock Edition can stack them up to 64 per slot, making bulk storage significantly easier on consoles and mobile devices.
How to Place and Interact With Your Armor Stand
Unlike standard blocks such as dirt or wood, armor stands are classified as Entities. This is a crucial distinction in Minecraft's code. Because they are entities (like zombies, pigs, or minecarts), they obey gravity. If you break the block underneath an armor stand, it will fall. They can also be pushed by pistons, bounced by slime blocks, and carried away by flowing water.
Equipping Items
To place the stand, simply right-click (or use your controller's place block button) on any solid surface. Once placed, you can equip it with gear. Holding a piece of armor and right-clicking the stand will instantly equip it to the corresponding slot. Armor stands can hold:
- All types of helmets, chestplates, leggings, and boots.
- Elytra wings.
- Mob heads (Creeper, Zombie, Skeleton, Wither Skeleton, Dragon, Piglin).
- Carved Pumpkins.
Breaking and Moving
If you misplace your stand or want to move it, you must break it. Hitting the stand twice quickly with your hand or any tool will break it, causing it to drop as an item along with all the gear it was currently holding. Note that in Adventure Mode, players cannot break armor stands, which is a useful feature for map makers who want to create permanent displays.
Why Does My Armor Stand Look Different in Java vs Bedrock
If you watch Minecraft tutorials online, you might notice that armor stands behave differently depending on the creator's platform. There is a significant parity gap between Java Edition (PC) and Bedrock Edition (Console, Mobile, Windows 10/11) regarding this specific entity.
| Feature | Java Edition | Bedrock Edition |
|---|---|---|
| Default Appearance | Straight vertical sticks, no arms. | Includes arms by default. |
| Posing Mechanics | Requires complex NBT commands. | Built-in "Pose" button (crouch + interact). |
| Holding Items | Cannot hold items in hands without commands. | Can hold swords, tools, and items naturally. |
| Entity Health | 20 HP (10 Hearts) | 6 HP (3 Hearts) |
The most notable difference is the presence of arms. Bedrock players enjoy a highly versatile decorative tool right out of the box, capable of holding swords and striking dynamic poses. Java players, by default, receive a static mannequin that can only wear armor. However, Java players can access these features using in-game commands.
How to Add Arms and Change Poses in Every Version
Customizing your display is where the true creative potential of this item shines. Here is how to manipulate poses and limbs based on your game version.
Bedrock Edition Posing
In Bedrock Edition, posing is a native feature. To change a stand's pose, simply crouch (sneak) and approach the entity. A prompt will appear on your screen saying "Pose." Pressing the interact button will cycle the stand through 13 distinct poses, ranging from a standard resting stance to dynamic attacking and blocking animations. You can also equip an item to its hand by holding the item and interacting with the stand.
Java Edition Commands
Java players must rely on commands to modify their stands. To summon an armor stand with arms, you must use NBT (Named Binary Tag) data. Open your chat console and type the following command:
/summon armor_stand ~ ~ ~ {ShowArms:1b}
The ~ ~ ~ coordinates will summon the stand exactly where you are standing. According to the Minecraft Fandom Wiki's command documentation, you can stack multiple NBT tags to create highly customized entities. For example, adding {Invisible:1b} makes the wooden frame disappear (leaving only the floating armor), and {Small:1b} creates a miniature version of the stand.
Because manually typing NBT tags for specific limb rotations (like bending the left arm 45 degrees) requires complex math, many Java builders use external Armor Stand Generators. These web-based tools provide a visual interface where you can drag the limbs into position, and the site generates the exact /summon command for you to copy and paste into a command block.
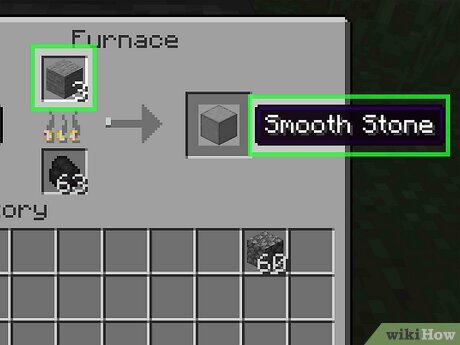
Image source: wikiHow
How to Make Your Armor Stands Dance Using Redstone
One of the most popular community tricks in Bedrock Edition is creating a "dancing" armor stand display. Because Bedrock stands can cycle through poses when they receive a redstone pulse, you can build a simple redstone clock to make them animate continuously.
The Dancing Circuit Tutorial
To build this, you will need: 3 Armor Stands, 3 Redstone Comparators, 1 Redstone Torch, and a handful of Redstone Dust.
- Place the Stands: Place three blocks in a row, with a one-block gap between each. Put an armor stand on top of each block.
- The Power Source: Place a Redstone Torch on the front of the blocks holding the stands.
- The Comparator Loop: Go behind the stands. Place one Redstone Comparator facing away from the stands. Next to it, place two Redstone Comparators facing toward the stands.
- Connect the Dust: Use Redstone Dust to connect the comparators in a loop, and run the dust up to the blocks underneath the armor stands.
When connected correctly, the comparators will create a rapid, alternating redstone pulse (a clock circuit). This pulse forces the armor stands to rapidly cycle through their 13 poses, creating a fluid "dancing" animation. This is an excellent method for creating lively displays in multiplayer bases or custom maps.
Advanced Pro Tips for Decorating and Map Making
Beyond basic storage and redstone dancing, armor stands possess several unique properties that advanced builders leverage for intricate designs.
The Totem of Undying Secret
In Bedrock Edition, armor stands have a fascinating interaction with the Totem of Undying. If an armor stand is holding a Totem in its hand and is subjected to fatal damage (such as being caught in a splash potion of harming or a localized explosion), the stand will actually "consume" the totem. The totem animation will play on screen, and the armor stand will survive the damage. While highly situational, it is a remarkable mechanic for custom adventure maps.
Dispenser Placement Tricks
Because armor stands are entities, they can be placed by Dispensers. If you put an armor stand inside a Dispenser and power it with redstone, the stand will be deployed directly in front of the Dispenser. Furthermore, Dispensers can automatically equip gear onto an empty armor stand if the stand is directly in front of it.
More importantly, Dispensers can deploy armor stands inside of certain blocks where a player normally couldn't place them manually. Builders often use pistons to push glass blocks down onto an armor stand, creating a museum-style display case.
Finding Natural Spawns
If you don't want to craft them, you can occasionally find them in the wild. Taiga villages have a chance to generate an outdoor armory structure. These armories consistently spawn with two armor stands—one typically wearing an iron helmet, and the other wearing an iron chestplate. You can break these stands and take them home.
Frequently Asked Questions
Why can't I craft an armor stand with cobblestone slabs?
How do you give an armor stand a sword?
/summon armor_stand ~ ~ ~ {ShowArms:1b} to spawn a stand with arms, after which you can equip items to its hands using further NBT data or dispenser mechanics.
Can armor stands burn in lava or fire?
How do you make an armor stand invisible?
/data merge entity @e[type=armor_stand,limit=1,sort=nearest] {Invisible:1b}. This leaves only the equipped armor visible, creating a "ghost" effect.
Do armor stands despawn if left alone?
Can you enchant an armor stand?
Key Takeaways and Final Thoughts
Armor stands offer a highly versatile way to showcase your progression and decorate your builds. By understanding the specific material requirements and version differences, you can avoid the common frustrations associated with crafting them.
- The Smooth Stone Rule: Always smelt your cobblestone twice. Regular stone or cobblestone slabs will cause the recipe to fail.
- Version Differences Matter: Bedrock players get arms and posing by default, while Java players must utilize NBT commands to achieve the same look.
- They Are Entities: Remember that stands obey gravity and can be moved by water, pistons, and slime blocks, allowing for creative redstone integration.
- Redstone Animation: You can use a simple comparator clock circuit to force Bedrock armor stands to cycle through poses rapidly, creating a dancing effect.
- Customization is Deep: Using external command generators allows Java players to create invisible, miniature, or custom-posed stands for advanced map making.
Next time you return from a successful mining trip, try smelting some extra stone to set up a dedicated armory room for your spare gear.