
The Oilwell Basin in Monster Hunter Wilds is a masterclass in vertical level design, but it can be incredibly disorienting for players accustomed to the flat plains of the Windward Plains. During the Chapter 2-4 quest, "Search for the Black Flame," many hunters find themselves circling the Middle Stratum for hours, unable to find a way down to the volcanic depths. This frustration is compounded by a quest mechanic that intentionally disables your mount's auto-navigation, forcing a manual investigation of the environment.
In most Monster Hunter Wilds quests, your Seikret acts as a reliable GPS, carrying you directly to your target. However, the "Search for the Black Flame" is classified as an Investigation Quest. According to GameRant, the game requires you to gather ecological data before the monster's location is revealed on the map. Because the monster is technically "unknown," the Seikret has no scent to follow, leaving you to navigate the three-tier stratum system (Upper, Middle, and Lower) on your own.
When you enter the Oilwell Basin for this quest, you will notice a progress bar on the right side of your screen. This bar represents your current knowledge of the "Black Flame." You cannot simply stumble into the Lower Stratum and trigger the boss fight; the game scripts the encounter to remain hidden until you have interacted with enough environmental clues. This mechanic encourages players to observe the ecosystem, but it often leads to confusion when the Scoutflies remain dormant despite the player being in the correct general vicinity.
The Oilwell Basin is divided into three distinct layers that overlap on the mini-map. The Upper Stratum consists of the sun-bleached cliffs, the Middle Stratum contains the oil-slicked canyons and the main settlement, and the Lower Stratum is a subterranean volcanic hellscape. The transitions between these layers are often narrow crevasses or steep drops that are not clearly marked on the 2D map UI, leading many to believe they are glitched when they are actually just standing directly above their objective.
Before you even attempt to descend, you must prepare for the extreme environmental hazards of the depths. The Lower Stratum is not just visually hot; it inflicts a persistent status effect known as Heat Exhaustion. This chip damage will slowly drain your health, making a long boss fight nearly impossible without the proper countermeasures.
Mandatory for survival. These mitigate heat damage for 10 minutes. Always carry a full stack of five.
The Black Flame (Nu Udra) is highly resistant to Fire but exceptionally weak to Water-element attacks.
Essential for curing "Oilmucus" blight, which slows your movement and increases fire damage taken.
As noted in the IGN Wiki, the transition to the Lower Stratum is immediate. The moment you enter the tunnels leading to Area 15, your health bar will begin to glow red. If you forget Cool Drinks, you can occasionally find Chillshrooms near the entrance of Area 13, but relying on environmental spawns is a risky strategy. It is widely regarded as one of the most important preparation steps to craft these at the base camp before departing.
Nu Udra is a Leviathan-class monster that thrives in oil and fire. Consequently, its hide is hardened against heat. Bringing a Fire or Blast weapon to this fight is a significant disadvantage. Instead, focus on weapons from the Jyuratodus or similar water-based trees. The water element not only deals increased damage but also helps "wash away" the oil coating on the monster's limbs, making them easier to break.
To begin the quest in earnest, you must head to Area 7 in the Middle Stratum. This area serves as the primary feeding ground for the local wildlife and is where the Black Flame has left the most evidence of its presence. You cannot skip this step; even if you know exactly where the monster lives, the entrance to its lair will often remain inaccessible or the monster simply won't spawn until the investigation bar is filled.
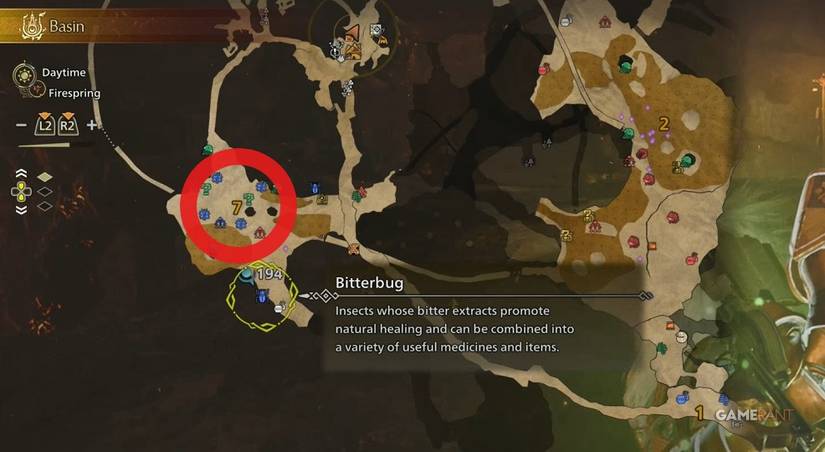
Once in Area 7, look for two specific types of clues:
This is where many players lose time. If you re-enable auto-pathing once the Scoutflies are active, the Seikret will take a long, circuitous route through Area 8 and Area 10 to reach the bottom. However, there is a Manual Control Efficiency Hack that allows you to reach the Lower Stratum approximately 60% faster than the scripted path.
The Seikret's AI is programmed to avoid steep drops and hazardous terrain unless explicitly commanded otherwise. By taking manual control, you can navigate the verticality of the Basin much more effectively. This technique is a significant advancement for speedrunners and efficient farmers alike. Once you land at the bottom of the Area 9 bowl, look for the southern exit—the air will begin to shimmer with heat, indicating you have successfully reached the transition point to the Lower Stratum.
A common issue reported by the community is the "disappearing" Area 11. Many players pass through the Middle Stratum without ever seeing this section of the map update. This is due to a specific map UI behavior where certain sub-levels don't register until you physically stand on a specific coordinate. Area 11 is crucial because it contains high-density resource nodes and a hidden path to one of the most useful camps in the region.
To reveal Area 11, head to the southern corridor of Area 9. You will encounter a T-junction.
Once you are in the Lower Stratum, follow the "Crimson Rivulet"—a series of lava flows that act as a natural path toward the heart of the volcano. Your destination is Area 15. This is the lair of the Black Flame, which is revealed to be the monster Nu Udra. Before you engage the beast, it is highly recommended to set up your forward operating base.
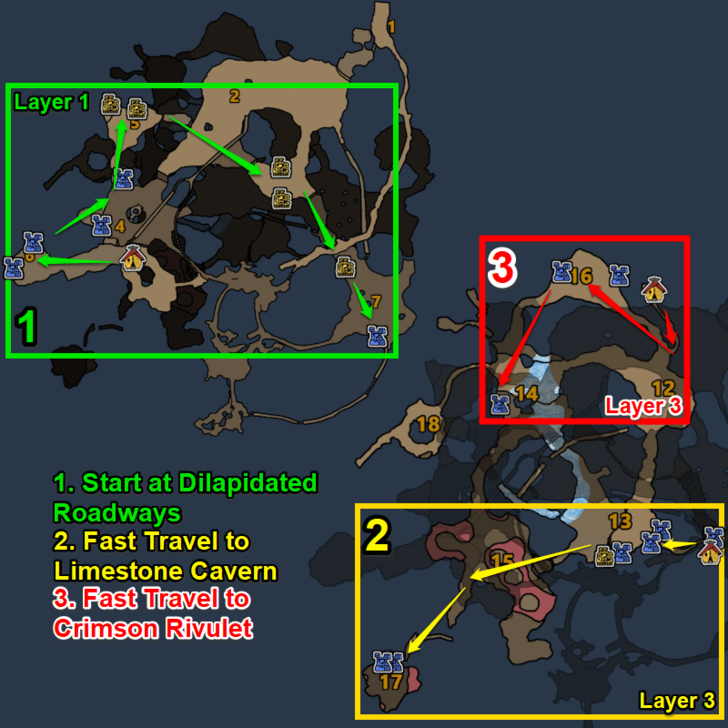
The Lower Strata North camp is located just past the main lava field in Area 15. It costs 75 Guild Points to establish. However, be warned: this camp is labeled as "Dangerous" in the game files. As noted by Game8, if you lure Nu Udra too close to the camp during the fight, the monster can destroy the tents and equipment, temporarily disabling your ability to fast travel or change gear. Always try to keep the combat centered in the middle of the arena, away from the camp's entrance.
Nu Udra is a formidable opponent that uses its oily secretions to create explosive traps across the battlefield. The fight is a test of positioning and elemental management. While many hunters rely solely on raw damage, using the environment to your advantage is a much more effective strategy.
| Status Effect | Effectiveness | Notes |
|---|---|---|
| Poison | High | Drains health rapidly due to high metabolism. |
| Sleep | High | Excellent for setting up barrel bomb wake-ups. |
| Stun | Medium | Requires focus on the head/mouth area. |
| Exhaust | High | Slows down its rapid oil-spraying attacks. |
| Flash/Sonic | Immune | Do not waste these items; Nu Udra is unaffected. |
One of the most overlooked tactics in this fight is the use of Watermoss. You can find these slinger ammos growing on the damp walls near the entrance to Area 15. Firing Watermoss at Nu Udra’s glowing oil-sacs or its flaming mouth will immediately douse the fire. This not only prevents its most powerful explosive attacks but also creates a "softened" hitzone. For melee players, this is a top-tier tactic to increase damage output without needing specialized armor skills.
While you are exploring the Lower Stratum and the nearby Area 13 (Limestone Cavern), you should make a habit of looting every Bone Pile you see. These nodes provide Sturdy Bones, a mid-tier crafting material. While these are used for armor, they have a much more valuable secondary use for Gunners and Rangers.
Once you return to the Base Camp, speak to Trader Aida. She offers a specific exchange that is often missed by generalist guides: you can trade 2x Sturdy Bone for 10x Bomberries. For Bowgunners, this is one of the most efficient ways to maintain a steady supply of explosive ammo without spending Zenny or farming plants in the wild. This trading loop ranks among the top resource management strategies for the mid-game, ensuring you are always ready for the next high-rank encounter.
Before heading out, ensure your inventory is stocked with Nulberries and Water-elemental coatings to handle Nu Udra's unique oil mechanics effectively.
